17 January 2011

Fabric Bracelets

You can easily make your own bracelets with some fabric and sass.
These plastic bracelets are cute for someone somewhere I'm sure, but I think they look much better when personalized :)
All you need is fabric, fabric glue, and a bracelet for recovering.
Start by cutting out a rectangle piece of fabric. (make sure it is long enough to cover the whole thing. It's better to have it too long than too short -you can always cut off the excess later.)
Paint a layer of fabric glue right on top of the bracelet, then slowly wrap the center of the fabric around making sure it sticks to the glue, pressing out any bubbles in the fabric.
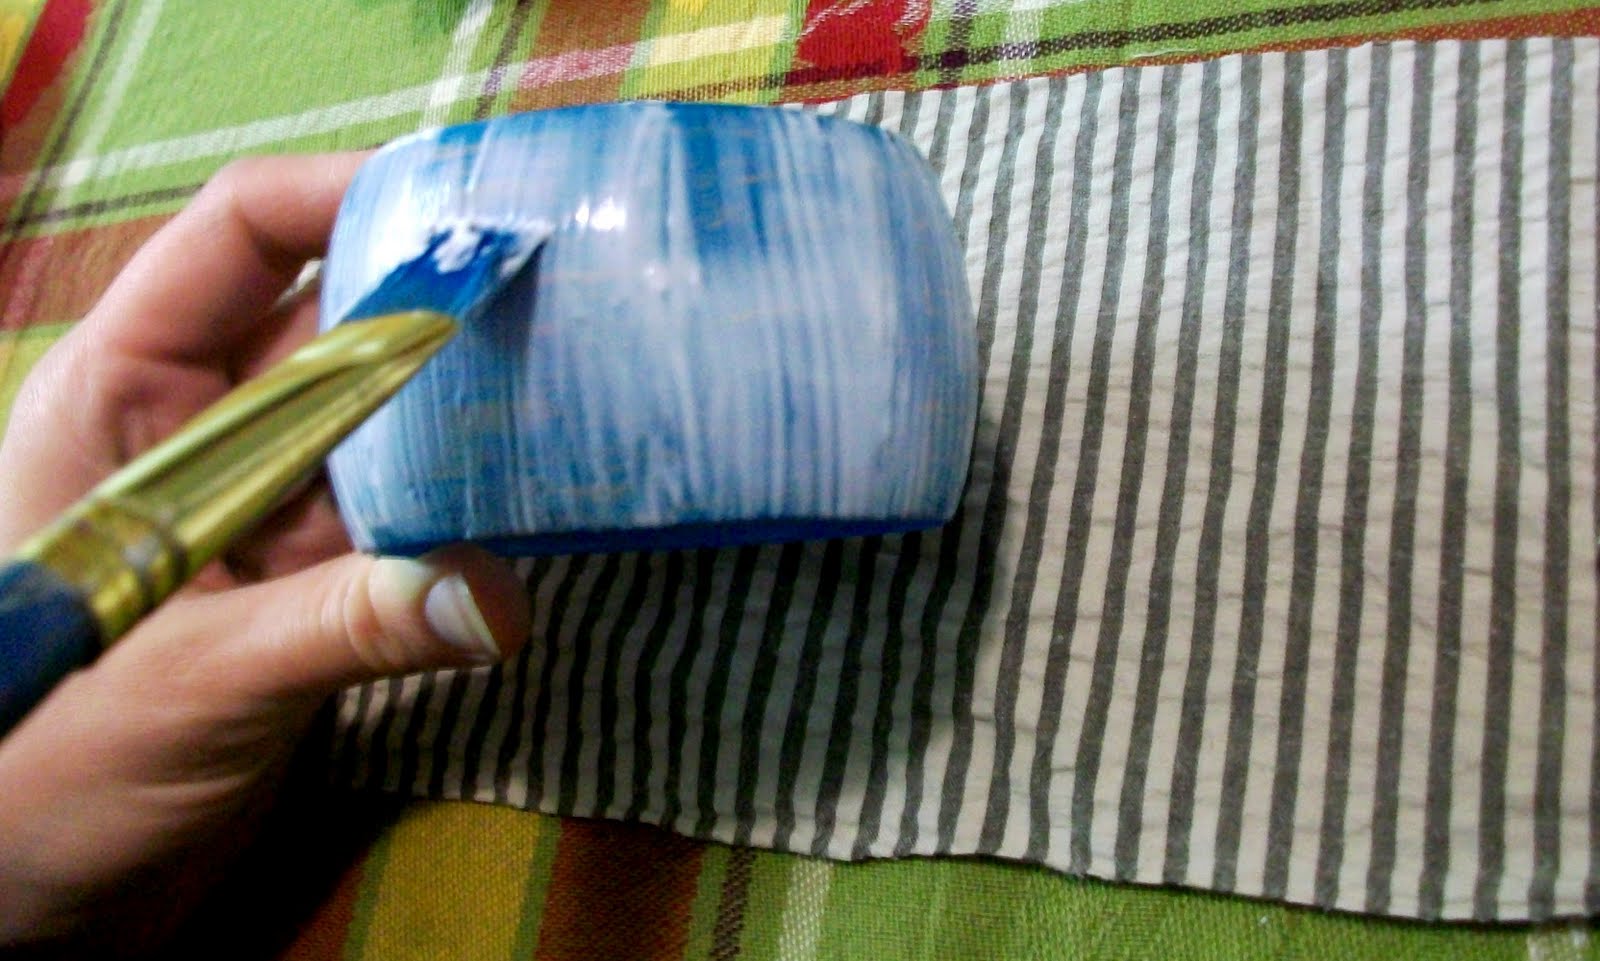
Once it's wrapped around it completely, cut off any excess fabric if necessary.
Paint a layer of glue on the inside of the bracelet and wrap the fabric, one side at a time, underneath it. Dab a little glue over the raw edge on the inside to make sure it doesn't fray later on.
Then decorate as you wish!
I glued some lace around the whole thing, then made 3 fabric flowers and hot glued them over some tulle.
This one I used ribbon and glued a lacey ruffle over it by sewing a gathering stitch. Then used some glitter glue to sass it up a bit.
These were definitely fun [and easy] to make.

16 January 2011

2011 Planner Cover

Do you have a 2011 planner yet?
My sister said she needed a new planner for xmas, so I went to the store to look for one and they were all so LAME! The fanciest one was plain black with a zipper around it. Inside this thick black planner was 12 sheets of paper - one for each month. pathetic. I've seen better ones out there, but not in my neck of the woods. slim pickins here.

So I decided to get her one that had the kind of stuff I would want in a planner: monthly & weekly calendar, to-do lists, address & contact pages, the works! It could be as boring as it wanted on the outside because I would fancy it up :)
With some patterned cotton fabric for the cover, felt for some cushion, jewels, tulle, and lace for charm (which is totally appropriate since her name is Lacey) and with the help of this rotary cutter and guide, I made a personality for that boring planner...
...and almost kept it for myself.
It even has a pocket on the inside! If she uses sticky notes as much as I do, then she'll appreciate this here pocket. Threw a pen in there too because sticky notes are useless without that, duh.
Tie some colorful tulle around a paperclip and it's great to use as a bookmark to take you straight to your schedule.
I'm definitely going to make myself one. And a few others as gifts if I have time. If I have the patience, I'll create a tutorial so you can make your own.
*Another fabulous feature is that you can take it off, wash it, and use it for the coming years. It's just a cover :) (I wouldn't put it in the dryer though in case it shrinks)

15 January 2011

Vintage Magnets

Who doesn't need more magnets? Yes, I know they say it's tacky to keep your refrigerator cluttered with papers, lists, and blah blah blah... but I say with cute magnets, who cares? I'll have one disappointed 5 year old if I remove one fridge-worthy paper creation even so much as an inch! And no, I don't plan on using all these magnets strictly for my kitchen kindergarten display board...they make a great little gift.
All you need is some scrapbook paper...
Mod Podge, scissors, round magnets (i bought an 18 pk at walmart for under 3 bucks) , and round accent gems. You know those flattened marble things used for...not really sure what they're used for, but I see them everywhere. ?? You can buy a pound of them at the dollar store. They have all different shapes too.
This scrapbook paper was inspired by vintage nursery rhymes, but it'd also be a good idea to hit up a thrift store and buy an old vintage book with pictures or shakespeare quotes. Same idea.

Place the flat marble over the picture you want to capture, then trace around it. When you cut it out, you'll have to cut smaller than the trace-lines since the edges are rounded and you don't want the paper sticking out the backside.
Paint a thin layer of Mod Podge on the flat side of the marble.
Then place your picture face-down on top of the glue. The flat marbles I used were not perfectly round, so I had to make sure to line up the shape just right.
Make sure there are no bubbles in the paper, then paint another layer of Mod Podge over the backside of the picture. Lay flat and let dry completely.
Once dried, place a good amount of hot glue on the backside...
then place a round magnet right on top. Press down and hold until hot glue is hardened.
That's it!
You can easily create custom magnets to suit your style.
It's like looking at a mini picture blown up or reading a mini poem through a magnified glass. MARVELOUS! :)
To give out as gifts, I cut out small rectangled pieces of fabric and sewed super simple bags.
Fill it with magnets and tie some lace or ribbon around it.
Each one held about 5 magnets.
i enjoy cute ways to give simple gifts :)

14 January 2011

Chocolate Gifts

I know, I know, Christmas is over, but I haven't had a chance to post about super easy, delicious chocolate gifts yet!
...just a simple, wonderful way to decorate the average [large] chocolate bar.
A little scrapbook paper can really go a long way. I made these paper flowers from a tutorial I found on another blog. (I'll post the link later when I remember where it came from. Sorry.)
I really like this idea because you can use it for any occassion. Great for a 'just saying hello' gift to a friend or a side gift to stick in next to a birthday present.


chocolate and paper flowers make me happy.

Canvas Painting


This was inspired by a picture I saw in a catalog. It was on only one canvas and looked a bit different, (not to mention over-priced), but my imagination grows. (pun intended) My husband is standing behind it holding them together, so that's why it seems crooked :)

My sister asked if I'd paint her something for her newly re-decorated living room (which turned out muy eye-pleasing) and so I thought it'd be a good idea for her xmas gift. I always underestimate how long a painting takes, (because of 3 cute little interruptions) so when crunch time came around, I stayed up until 2 am three nights in a row to finish it. (was actually kind of fun because my hubby stayed up with me and we visited while I painted) I was just glad I got it done in time to bring it down with me for the holidays.
...and my favorite part...was knowing (or believing) that she really did love it.
Next time I go to her house, I'll have to take a pic of it hanging on the wall.
Is it wrong to love your own work? Cause I love it. (I guess because it turned out much better than I thought it would).