15 September 2011

Nursery Inspiration

I've been trying to decide how I want to decorate my little girl's room once we move. I've searched the Internet for a picture of the perfect nursery that I would want, but I cannot find anything. It's all so themed with flowers and ladybugs and too bright of colors for me. I guess I'm too picky. I know what I want in my mind and so I'll just have to make it myself. I'm on the lookout for the perfect fabric - maybe a damask print in lilac with a coordinating plum print. Throw in some cream colors, off-white, or white. Haven't decided. I did however, find some pictures for the inspiration of Averi Brooke's new nursery. (Yes, Averi is a girl name. Especially when you put a heart instead of a dot over the i )

love the idea/colors of this pillow and would be super easy to make
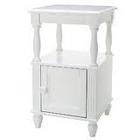
 cute little table to sit next to the rocking chair. Maybe painted a distressed plum color.
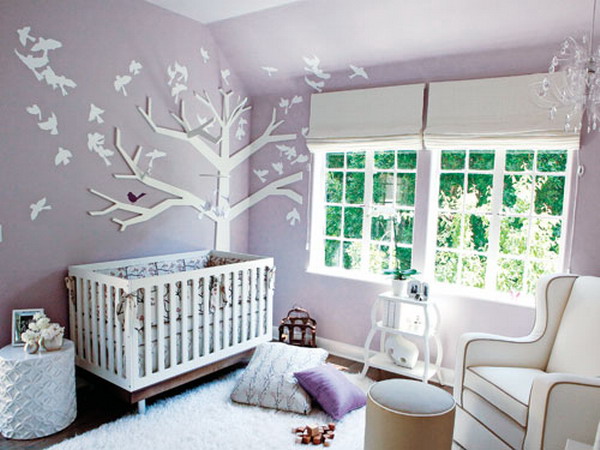
 this nursery is a bit too modern for me, but i like the feeling it gives. it's refreshing.
 white chandelier with white pearls/beads is a must. adds such feminine charm.
 Love the color on the walls- purplish gray. Also love the iron rod crib and all the fabrics.
 Pearls! I have some great ideas for decorating with sweet pearls.
 flowers on the side instead of being the focal point is much more my style

Excited to find the perfect fabrics and get to sewing and creating. Might be a while til it's all finished since I've got a lot going on, but I'll be posting as I go.

09 September 2011

Jimmy Rigged Candle Making

So...a blog I read made candle making look super easy. "Oh ya just melt this and pour that, and walla!" Since I had a candle that melted the wax right on top of it's own wick, I thought I'd give it a whirl and try to reuse the wax. Plus it smells amazingly tropical. You can use the microwave, but since mine had that little metal thing at the bottom of the wick somewhere inside the glass, I didn't have that option. So I patiently waited for the wax to melt upon my stove top over medium-low heat for 30 minutes.
 candlewicks and jar...check!
 This blog I read (really don't remember whose) said you simply dip the little metal part in the melted wax...
 ...and stick it down in the bottom center of your new glass. Once it dries, pour in the wax and it will stay.
Simple enough, right?
WRONG!!!
Once the hot wax touches it, it melts again! I should have known.
This is where the jimmy rigged part comes in...
I used bamboo skewers to hold the little metal knobs down on the bottom of the glass while snuggling frozen veggies to the sides to get it to cool faster. The hardest part was trying to get the stupid wicks to stay straight in the wax!
 So once I got the wicks to stay a little straight, I used the skewers to hold the wicks upright while it cooled completely. (I dipped my finger in the hot wax and put a dab on each side of the wick where it meets the skewer so when it dries, it would hold it in place and I could let go.)
Once you get it just right, DON'T BUMP IT! like i did.
 Then I used my new nifty candlewick trimmers (that I pretty much got for free at that sidewalk sale) to trim down both wicks once it dried- which took another 30 minutes
 I had a little wax left over and made a mini one in a tiny ketchup bottle.
Once it all cooled, I was happy.

I'm sure those of you, who actually know how to make candles, have some neat little tricks and/or gadgets to make this easy and are probably laughing at this post, but idc. 
Jimmy rigged or not, it worked out eventually.
:)

07 September 2011

Framed Tin Magnet Board

This project cost me under $7- which was just for the sheet of tin (on sale at Home Depot.)
Frame from my mom's garage, already had the ribbon, mod podge, paint,and screws.
If you want to make your own, hit up your mom's garage. or your own. or a thrift store, yard sale, whatev.
 
I'm sure this was nice to someone sometime, but not so much anymore. Outdated to say the least.
(Sorry to whoever painted this. Good things don't last forever, ya know?)
Which is why my mom was excited to get rid of it. Lucky for me.
Paper border? yep.
Most of it peeled right off, but for the stubborn areas, a wet washcloth dipped in fabric softener works miracles. and a butter knife :)

After I got all that fabulous paper off, I painted it white with a foam brush.
(Foam brushes work best if you have to paint over lots of groves.)
While waiting for the paint to dry, cut out strips of ribbon to make a border. You can use fabric, wall paper, scrapbook paper, etc. Using a foam brush, paint a layer of mod podge directly onto the artwork and lay down the ribbon. If your frame came without pretty art (lucky you), cut out a thick piece of cardboard, cork board, or thin plywood. Rub out any wrinkles or air bubbles in your border. Then paint a layer of mod podge right on top to seal it.
 Once it's all painted with mod podge, let it dry. Go back and paint a second coat on your frame, if necessary.
Then make your husband drill a hole in each corner of the tin.
Unless you're one of those cool chics and can do it yourself.
Twist those screws right down into the artwork/cardboard.
Yes, it actually stays. I'm amazed too.
Then have your husband cut off the sharp ends in the back with his Dremmel tool.
Again, unless you're a cool chic.

and make your husband hold it up while you take a picture :)
...and enjoy decorating with these easy and cute magnets you can make yourself.
I'm pretty sure you can also use dry erase markers on tin, but I haven't actually tried it.
You can use for pictures, notes, whatever.
I love how it turned out.

Thanks for your help, babe.

06 September 2011

Oh Happy Day

One would think there aren't very many perks to living in a small town, but I totally disagree in a non-biased way and this proves it...
What do you get when a boutique, who sells their adorable, over-priced pottery barn style home decor inside the pharmacy, has a sidewalk sale that no one knows about?
Delight aaaaaallllll over it.
That's right.
$5 per bag, whatever you can fit in it.
$5 for whatever you can't.
Um, are you sure you only want $5 for this?
There were so many cute things, I couldn't grab it all quick enough. The best part was that it was just me. (...well, almost. two other women, but whatev) Price tags were still on everything.

For $60 total, I got all this...
- Beautiful cream colored large ceramic bowl with the matching pitcher ($59)
- 4' 5" brand new decorative Christmas tree that sits inside a lovely piece of pottery ($120)
- Large high-quality wooden basket ($55)
- Small off-white rustic wired basket ($40)
- Fancy porcelain Santa Clause ($80)
- 2 Glass decorative bowls/vases ($30 ea)
- Glass tiered candle holder ($25)
- Wooden decorative house ($40) [sounds odd, but it's super cute. I'll have to post a pic]
- Beautiful, sparkly, Christmasy table centerpiece ($60)
- Muslin tablecloth ($50)
- Table runner ($30)
- 8 faux pears ($2 ea)
- 4 cute little xmas tree ornaments ($6 ea)
- Wooden letter 'A' ($8) - [for Averi]
- 3 small faux potted plants that sit together on a rectangular plate ($25)
- 8 classy candlesticks ($30)
- Fancy candlewic trimmer ($10)
- Reading glasses that fold up in this mini suitcase thing ($15) [I don't even use reading glasses, I just thought they were cute cause they were small, ha.]
- Wooden picture frame ($25)

I can't believe it either.
Did I luck out or did I luck out?
I should have taken pics, but I packed it all up in boxes over the weekend (except the pitcher)- now it will be like Christmas when we unpack at our new place. Yes, we're moving. Which is why I spent $60 on useless home decor. New house means new space, means new ideas, means new decor! Get my drift? If not, you'll see for yourself as I post pics of the new pad.

...got something great to post tomorrow. A lil som'n som'n I made Saturday night while the kids were sleeping. It turned out just the way I imagined it.

Til next time